OpenClaw + Feishu
Drive OpenClaw from a Feishu (Lark) bot.
Overview
OpenClaw is an open-source AI agent Gateway that acts as a bridge between chat applications and AI agents. Through a centralized Gateway process, it connects chat platforms like Telegram, WhatsApp, Discord, and Feishu (Lark) to AI coding agents, enabling direct AI programming interactions within chat windows. By configuring Z-Mint AI API as a custom model provider in OpenClaw and connecting a Feishu Bot, you can use Z-Mint AI’s Claude models (such as Claude 4.6 Opus, Claude 4.5 Sonnet, Claude 4.5 Haiku) for AI-assisted coding conversations directly in Feishu. The Feishu channel uses WebSocket long connection mode to receive messages — no public URL required. This guide covers:
- Installing and configuring OpenClaw Gateway
- Creating a Feishu enterprise application with bot capability
- Setting up Z-Mint AI API as a custom model provider
- Verifying the connection and getting started
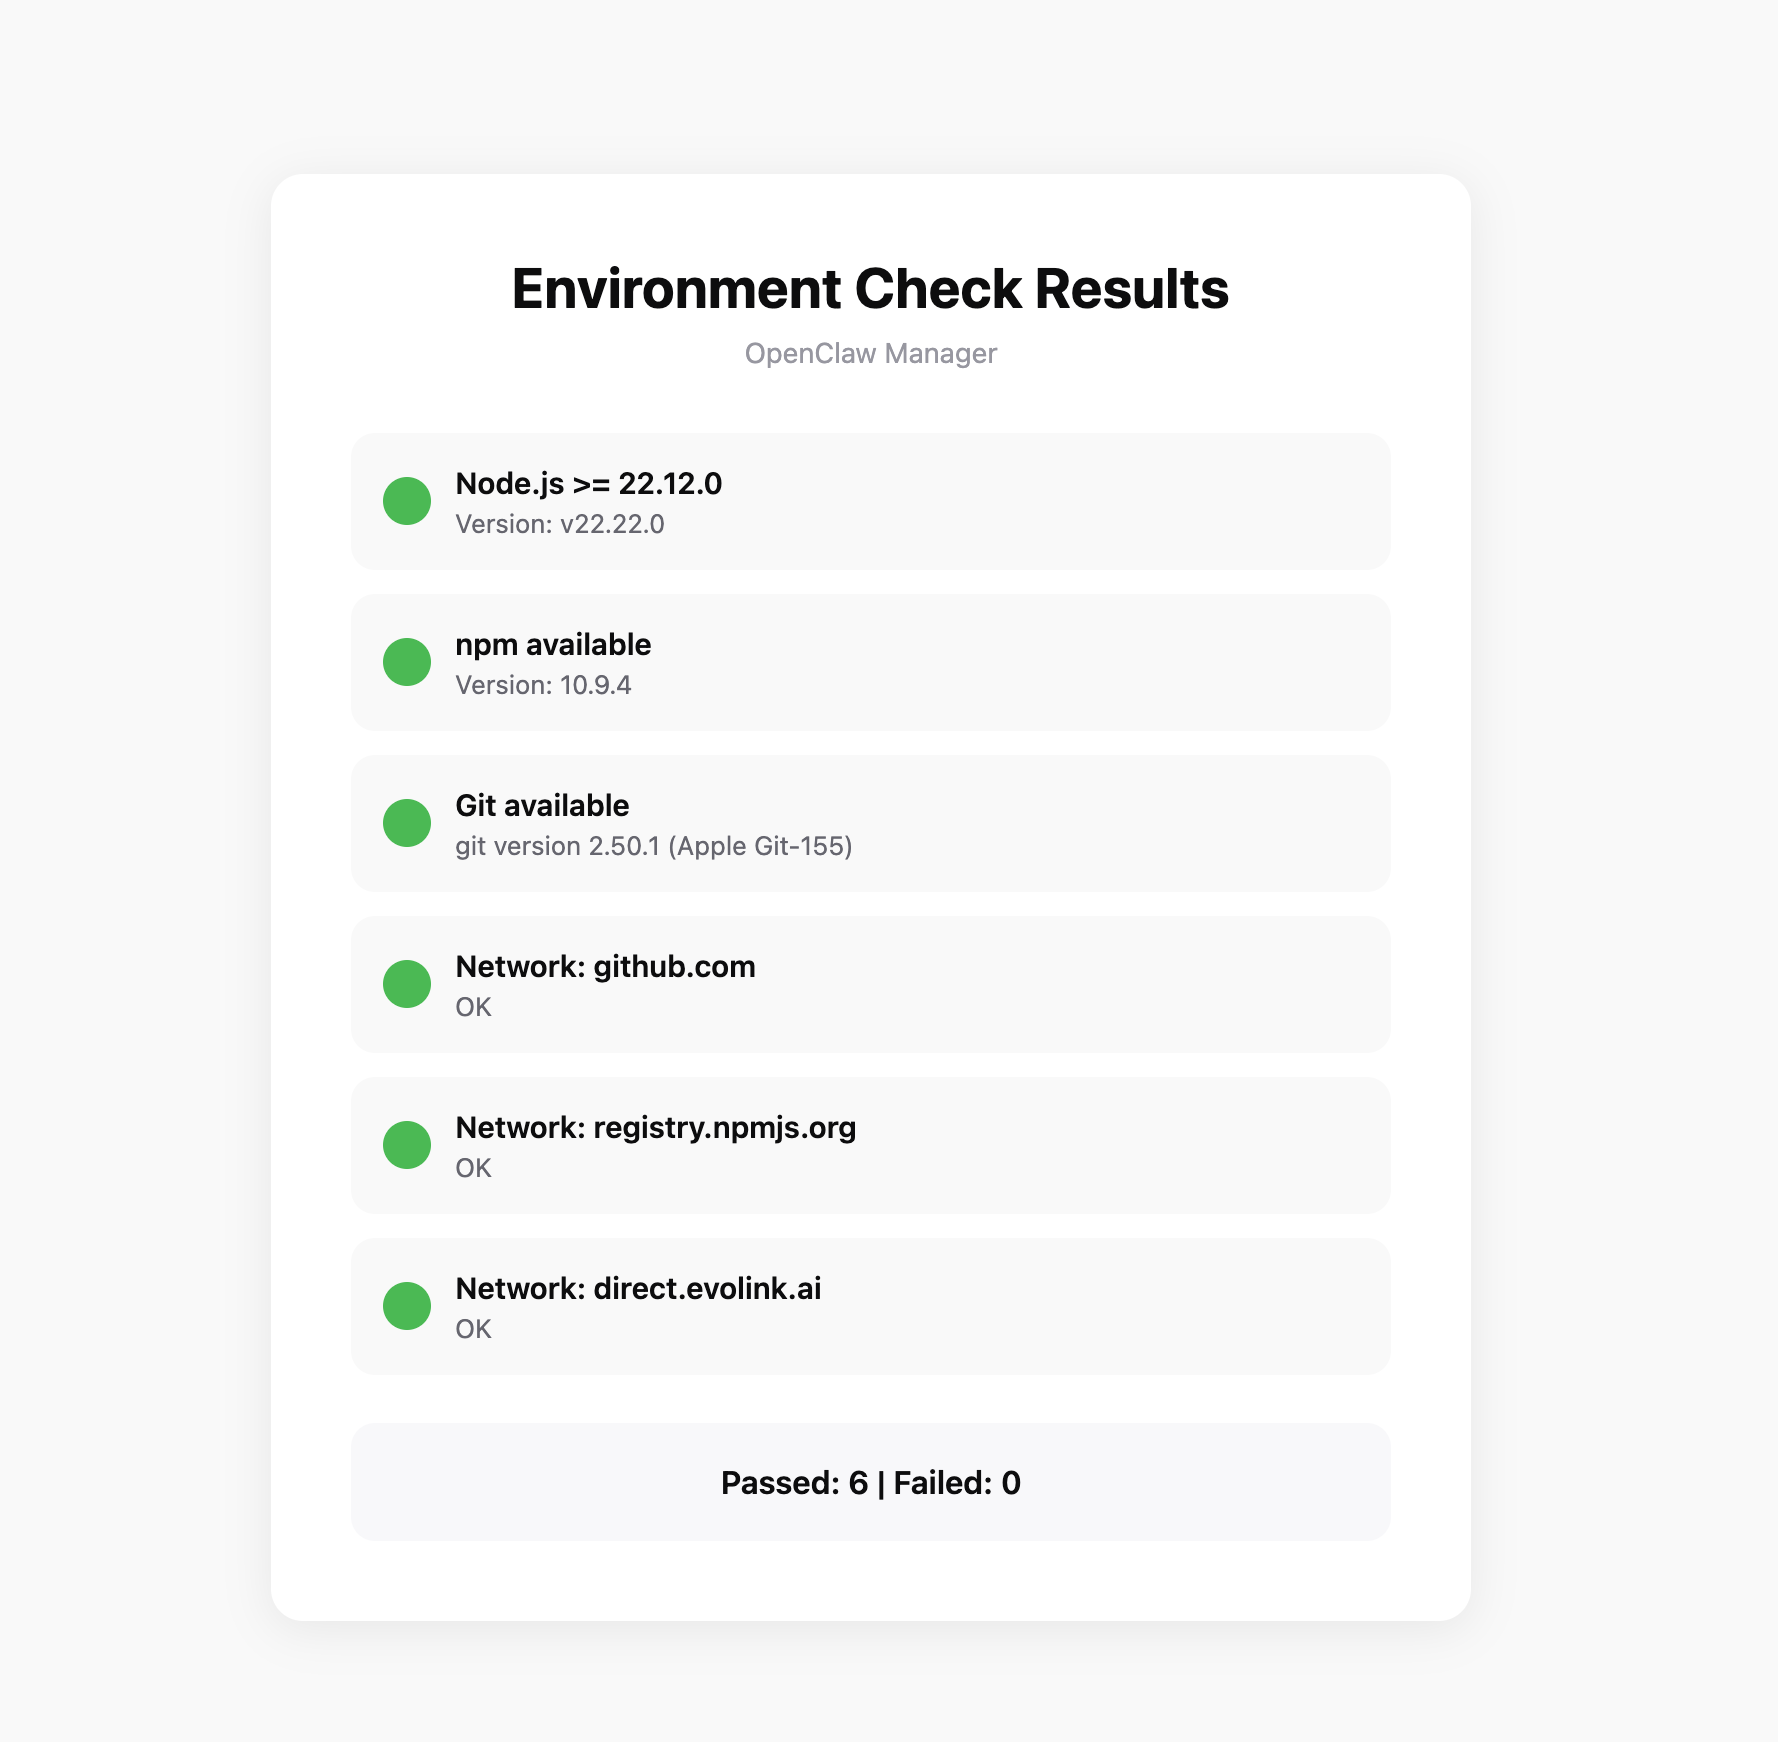
System Environment Check
Before installation, it’s recommended to run the environment checker tool to ensure your system meets OpenClaw’s requirements.
Download Checker Tool
Download the checker tool for your platform from GitHub Releases:
PlatformFilenameWindowsopenclaw-checker-win-x64.exemacOS (Intel)openclaw-checker-macos-x64macOS (Apple Silicon)openclaw-checker-macos-arm64Linuxopenclaw-checker-linux-x64
Check Items
The tool automatically checks the following:
- ✅ Node.js version (requires >= 22.12.0)
- ✅ npm available
- ✅ Git available
- ✅ Network connectivity (github.com, npmjs.org, aigc.zhengmi.org)
 If the check fails, the tool will provide specific fix suggestions.
Prerequisites
Before configuring, make sure you have:
1. Install Node.js
OpenClaw is installed via npm and requires Node.js 22 or higher.
- Windows
- macOS
Visit Node.js official website, download the Windows installer (.msi file), and run the installation program.After installation, open PowerShell to verify:
node --version
npm --version
It’s recommended to run PowerShell as administrator to avoid permission issues during installation.
Method 1: Using InstallerVisit Node.js official website, download the macOS installer (.pkg file), and run the installation program.Method 2: Using Homebrew
brew install node
After installation, open Terminal to verify:
node --version
npm --version
If you encounter permission issues during installation, you may need to add sudo before the command.
2. Get Z-Mint AI API Key
- Log in to Z-Mint AI Dashboard
- Find API Keys in the dashboard, click ‘Create New Key’ button, then copy the generated Key
- API Key usually starts with
sk-
3. Prepare a Feishu Account
You need a Feishu enterprise account to create applications on the Feishu Open Platform.
Step 1: Install OpenClaw
Run the following command in your terminal:
npm install -g openclaw@latest
Install the Feishu plugin:
openclaw plugins install @openclaw/feishu
Step 2: Onboarding
Run the onboarding command. OpenClaw will guide you through the initial setup and install the background daemon service:
openclaw onboard --install-daemon
1. Confirm Installation
The system will display a risk disclaimer. Confirm to proceed: 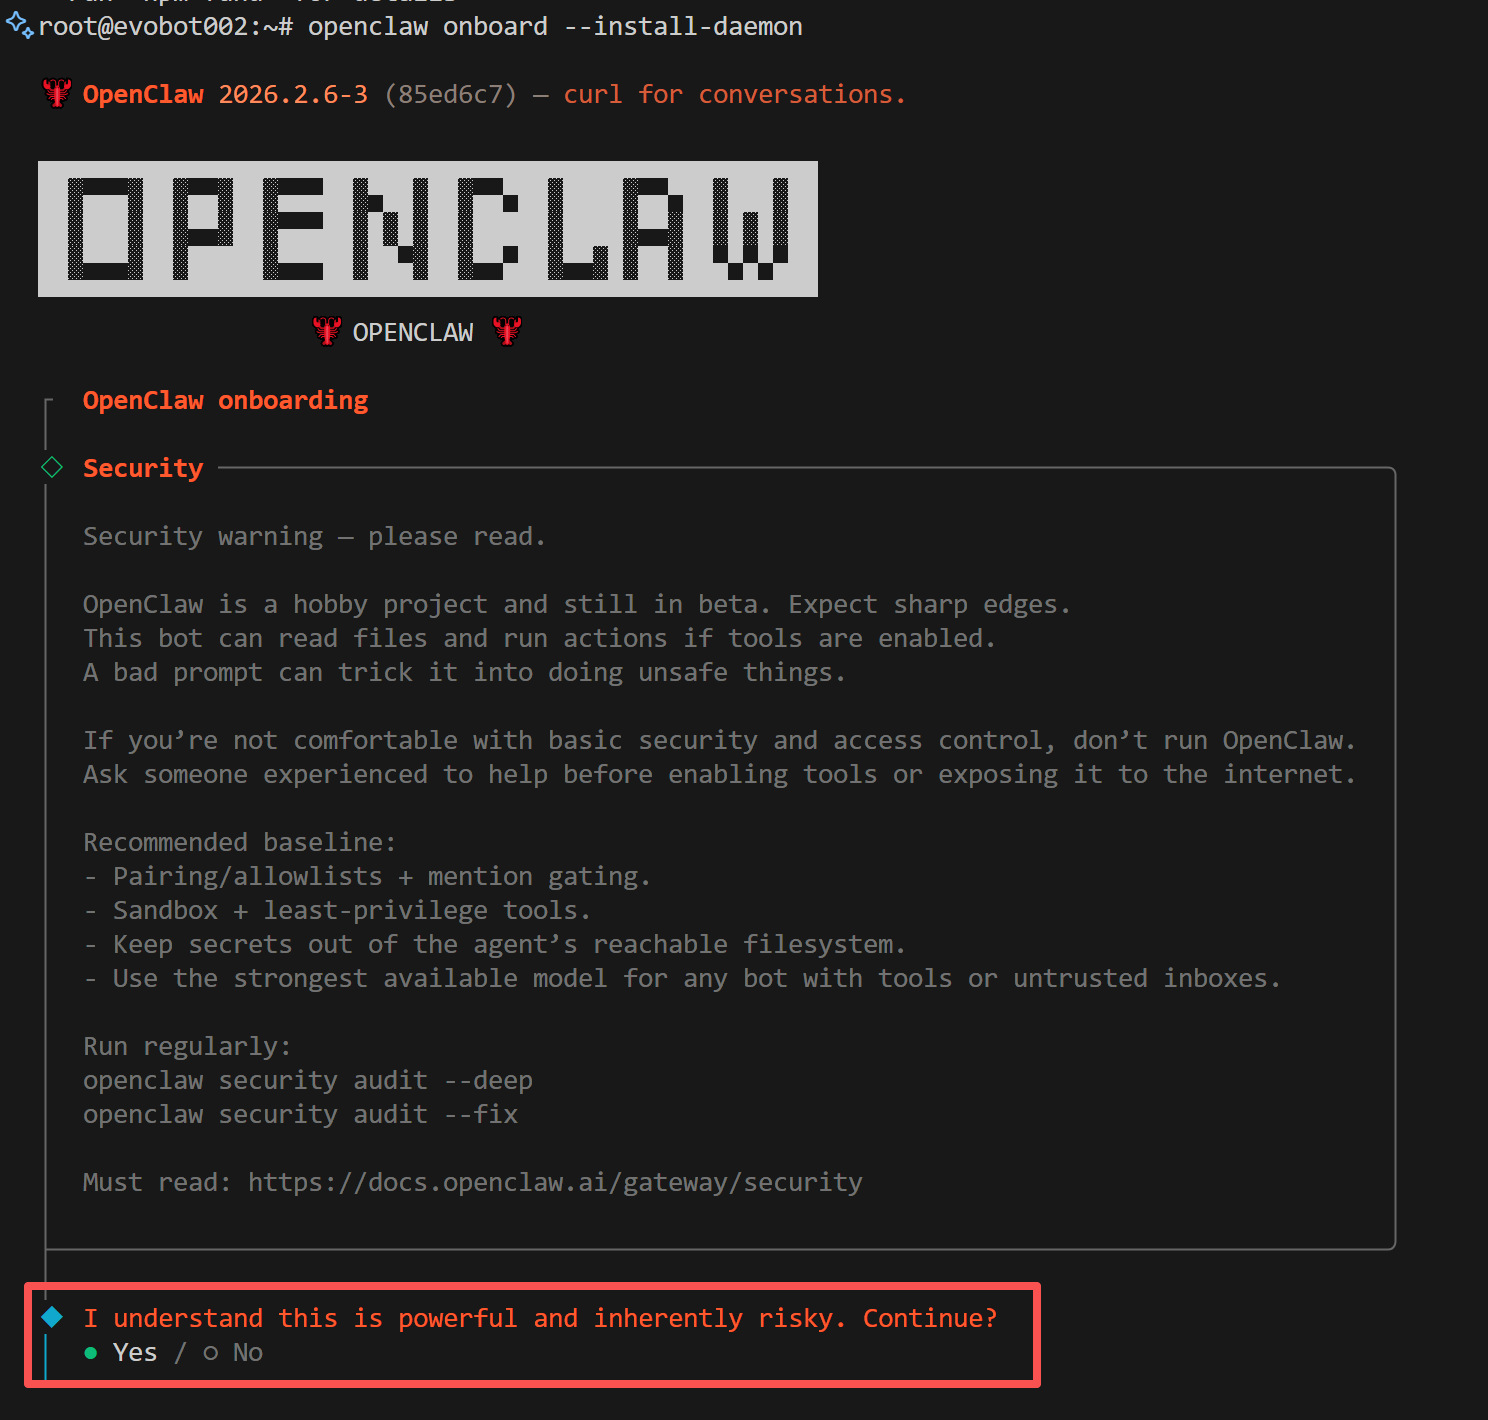
2. Select Installation Mode
When prompted to choose an installation mode, select Quickstart: 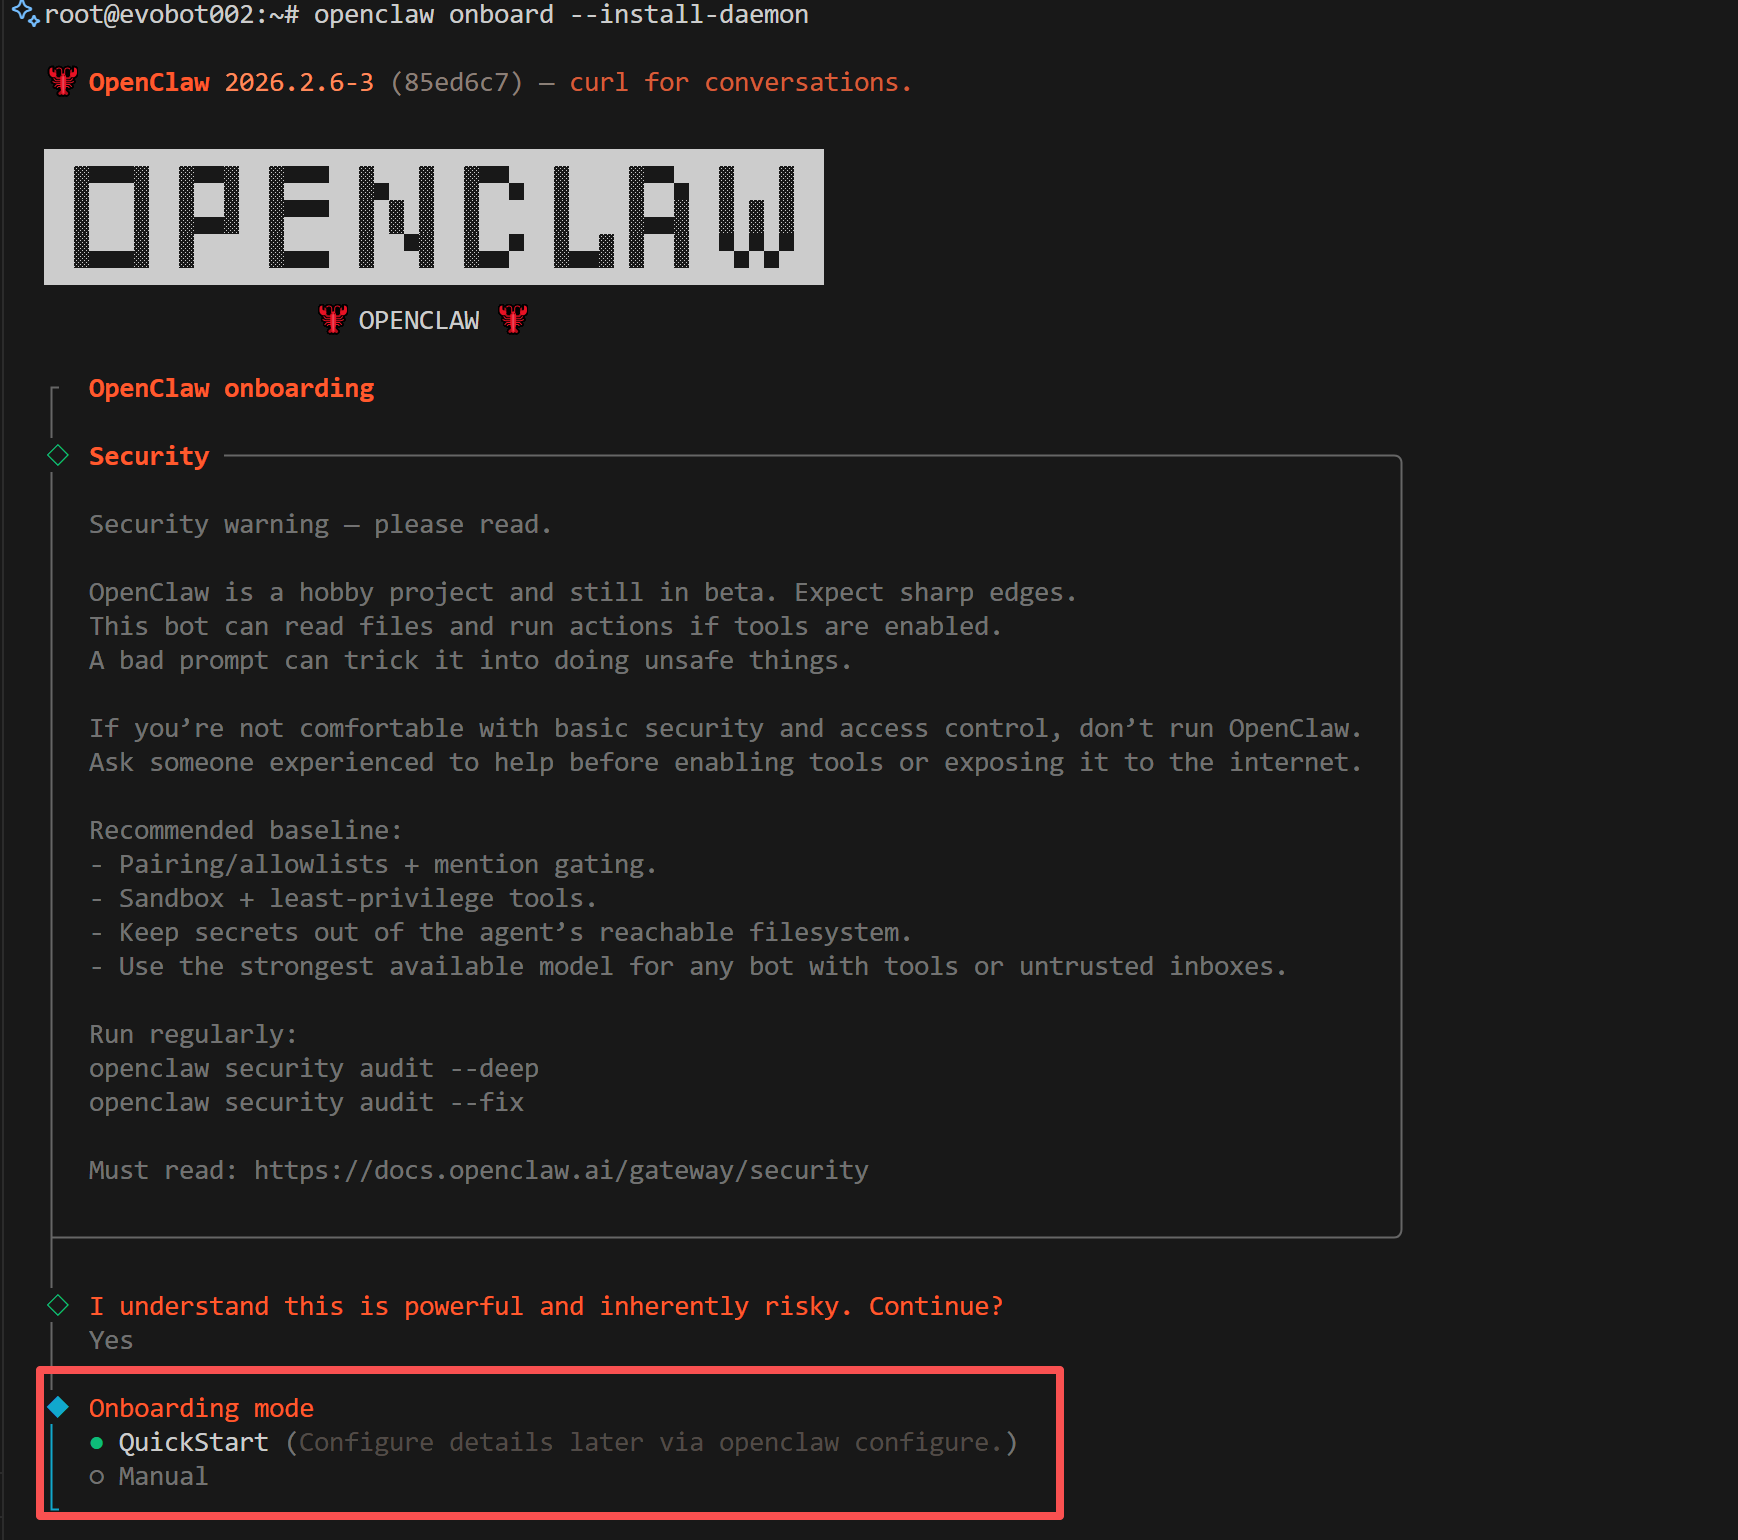
3. Select Provider
When prompted to choose a model provider, select Skip. We will manually configure Z-Mint AI as a custom provider later: 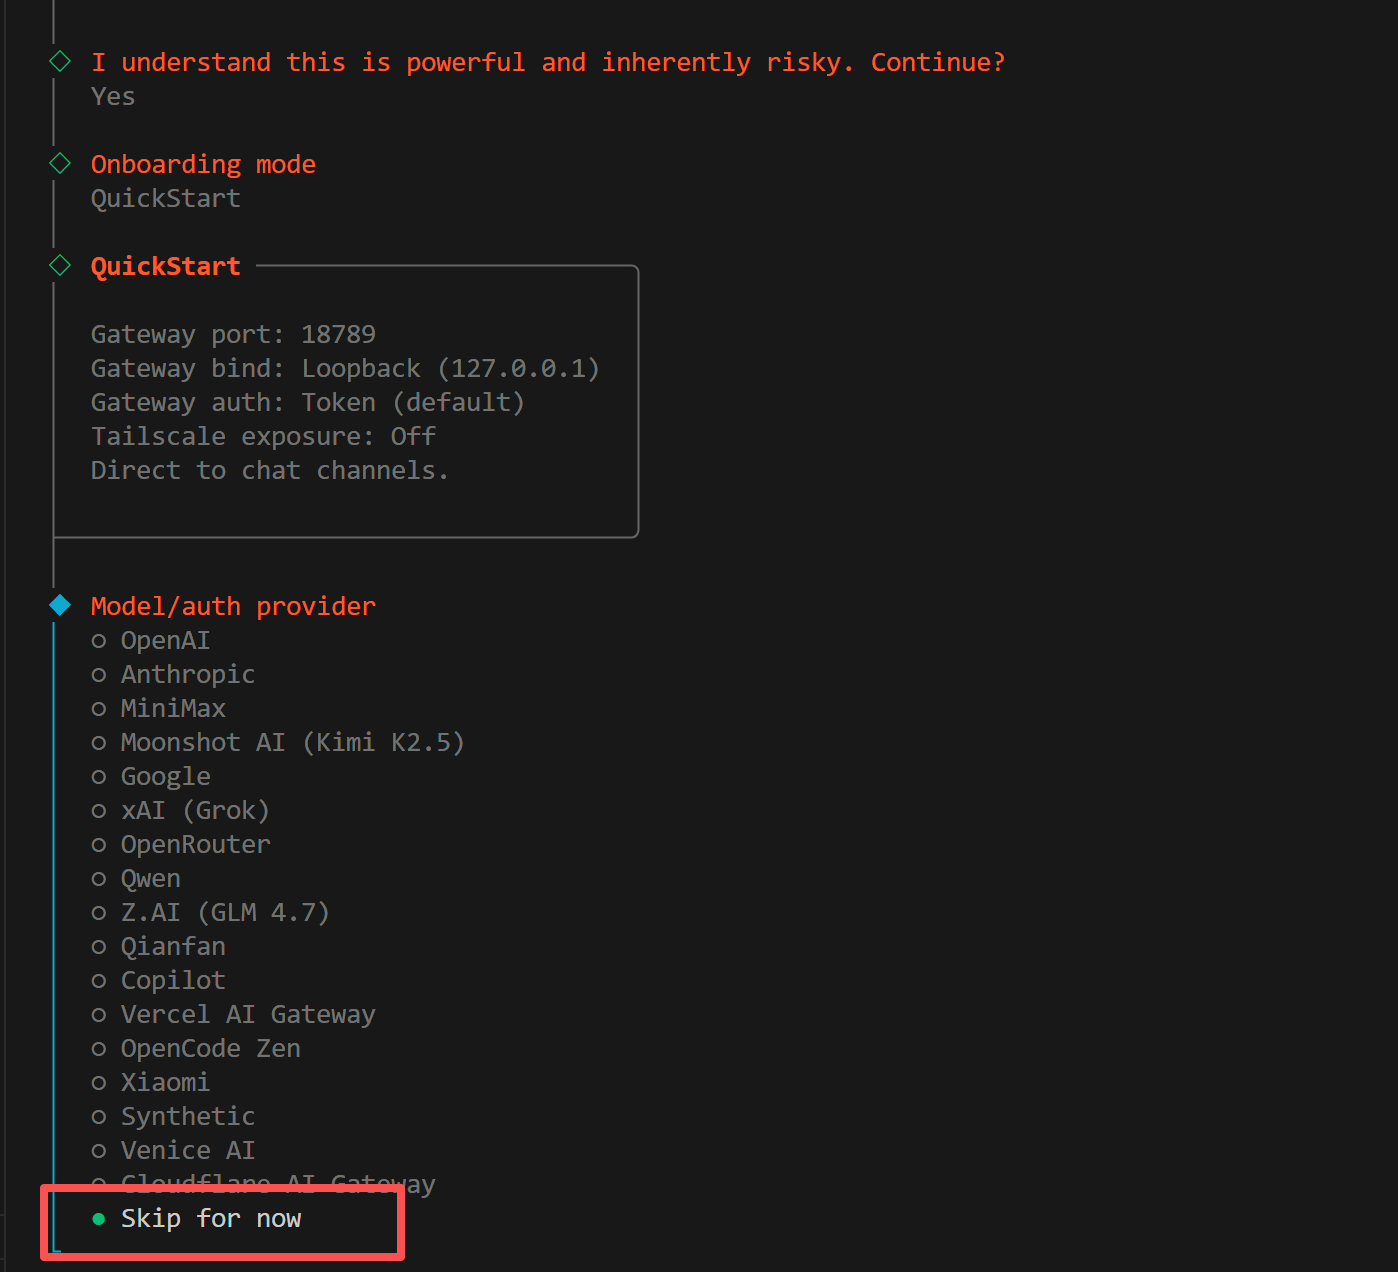
4. Select Models
When prompted to choose which models to enable, select All: 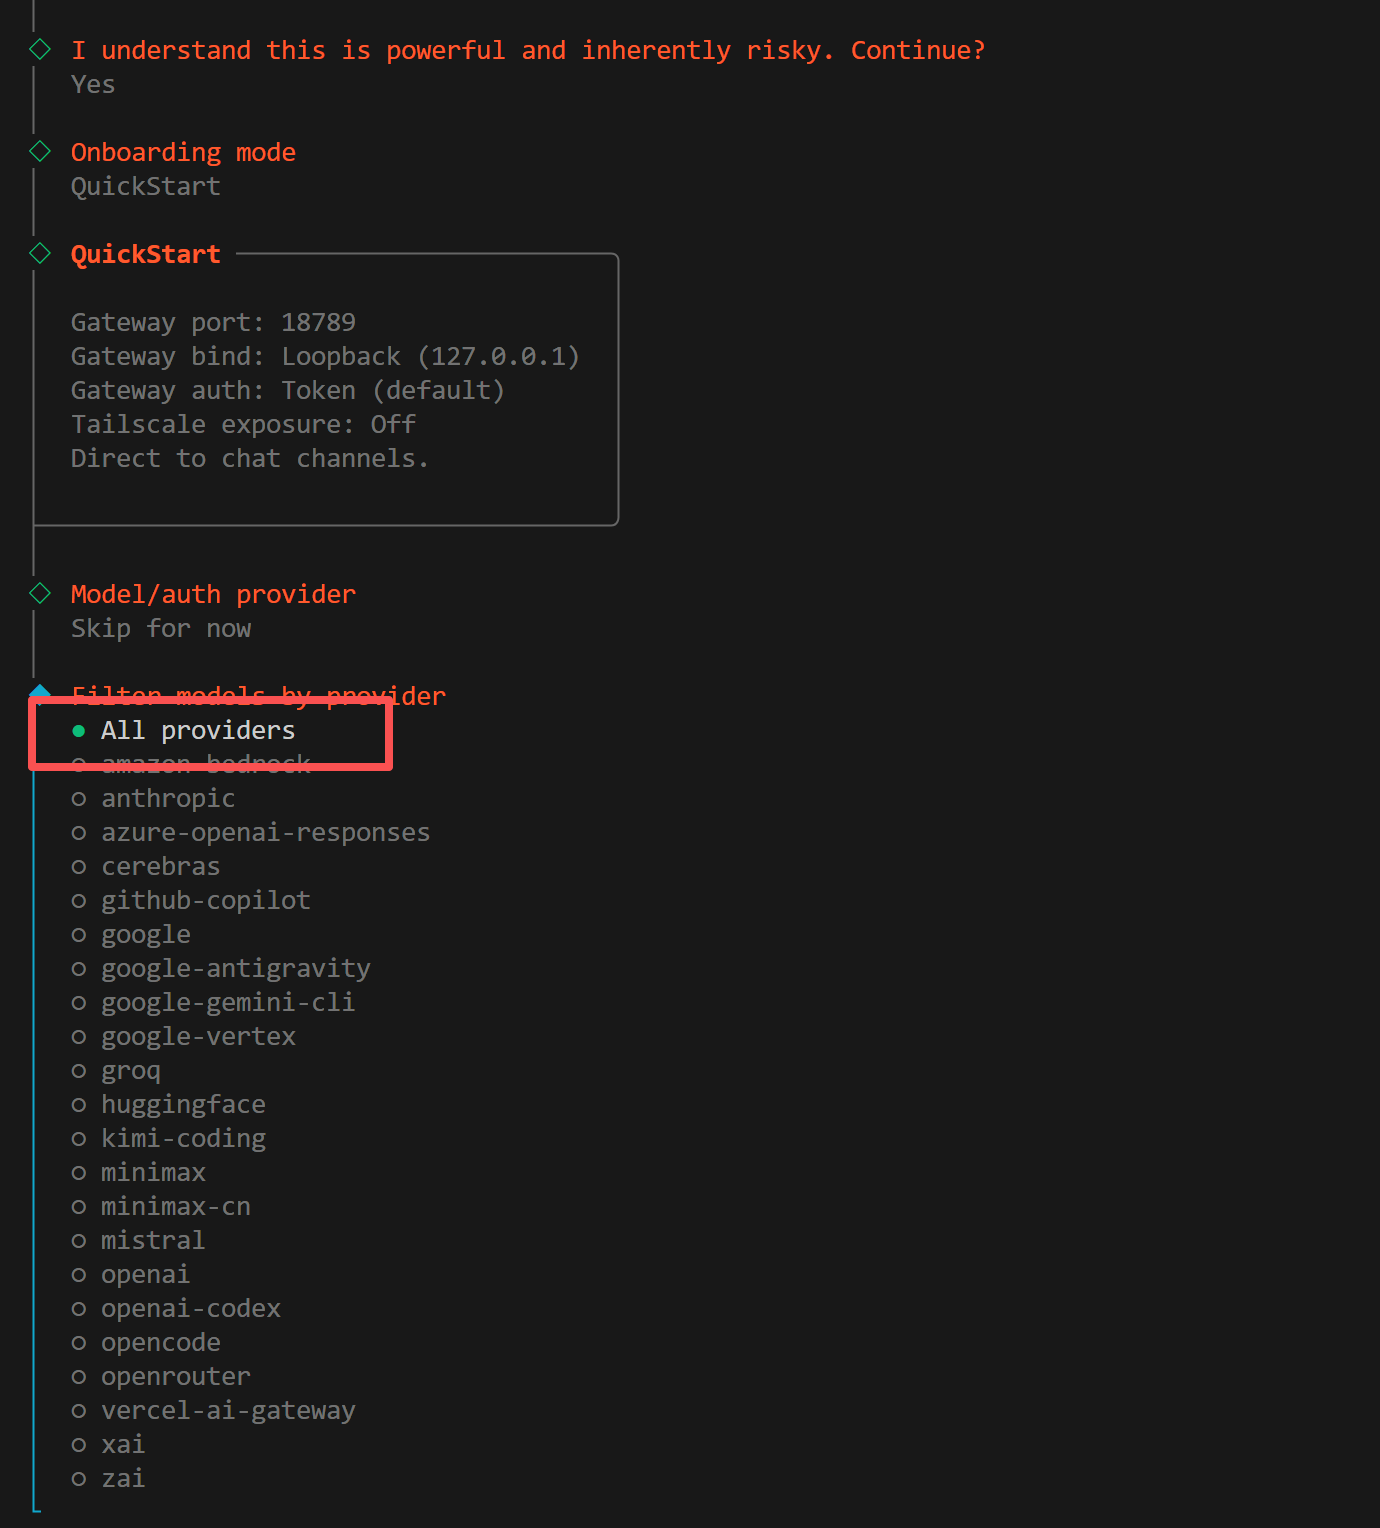
5. Select Default Model
When prompted to choose a default model, select Keep current: 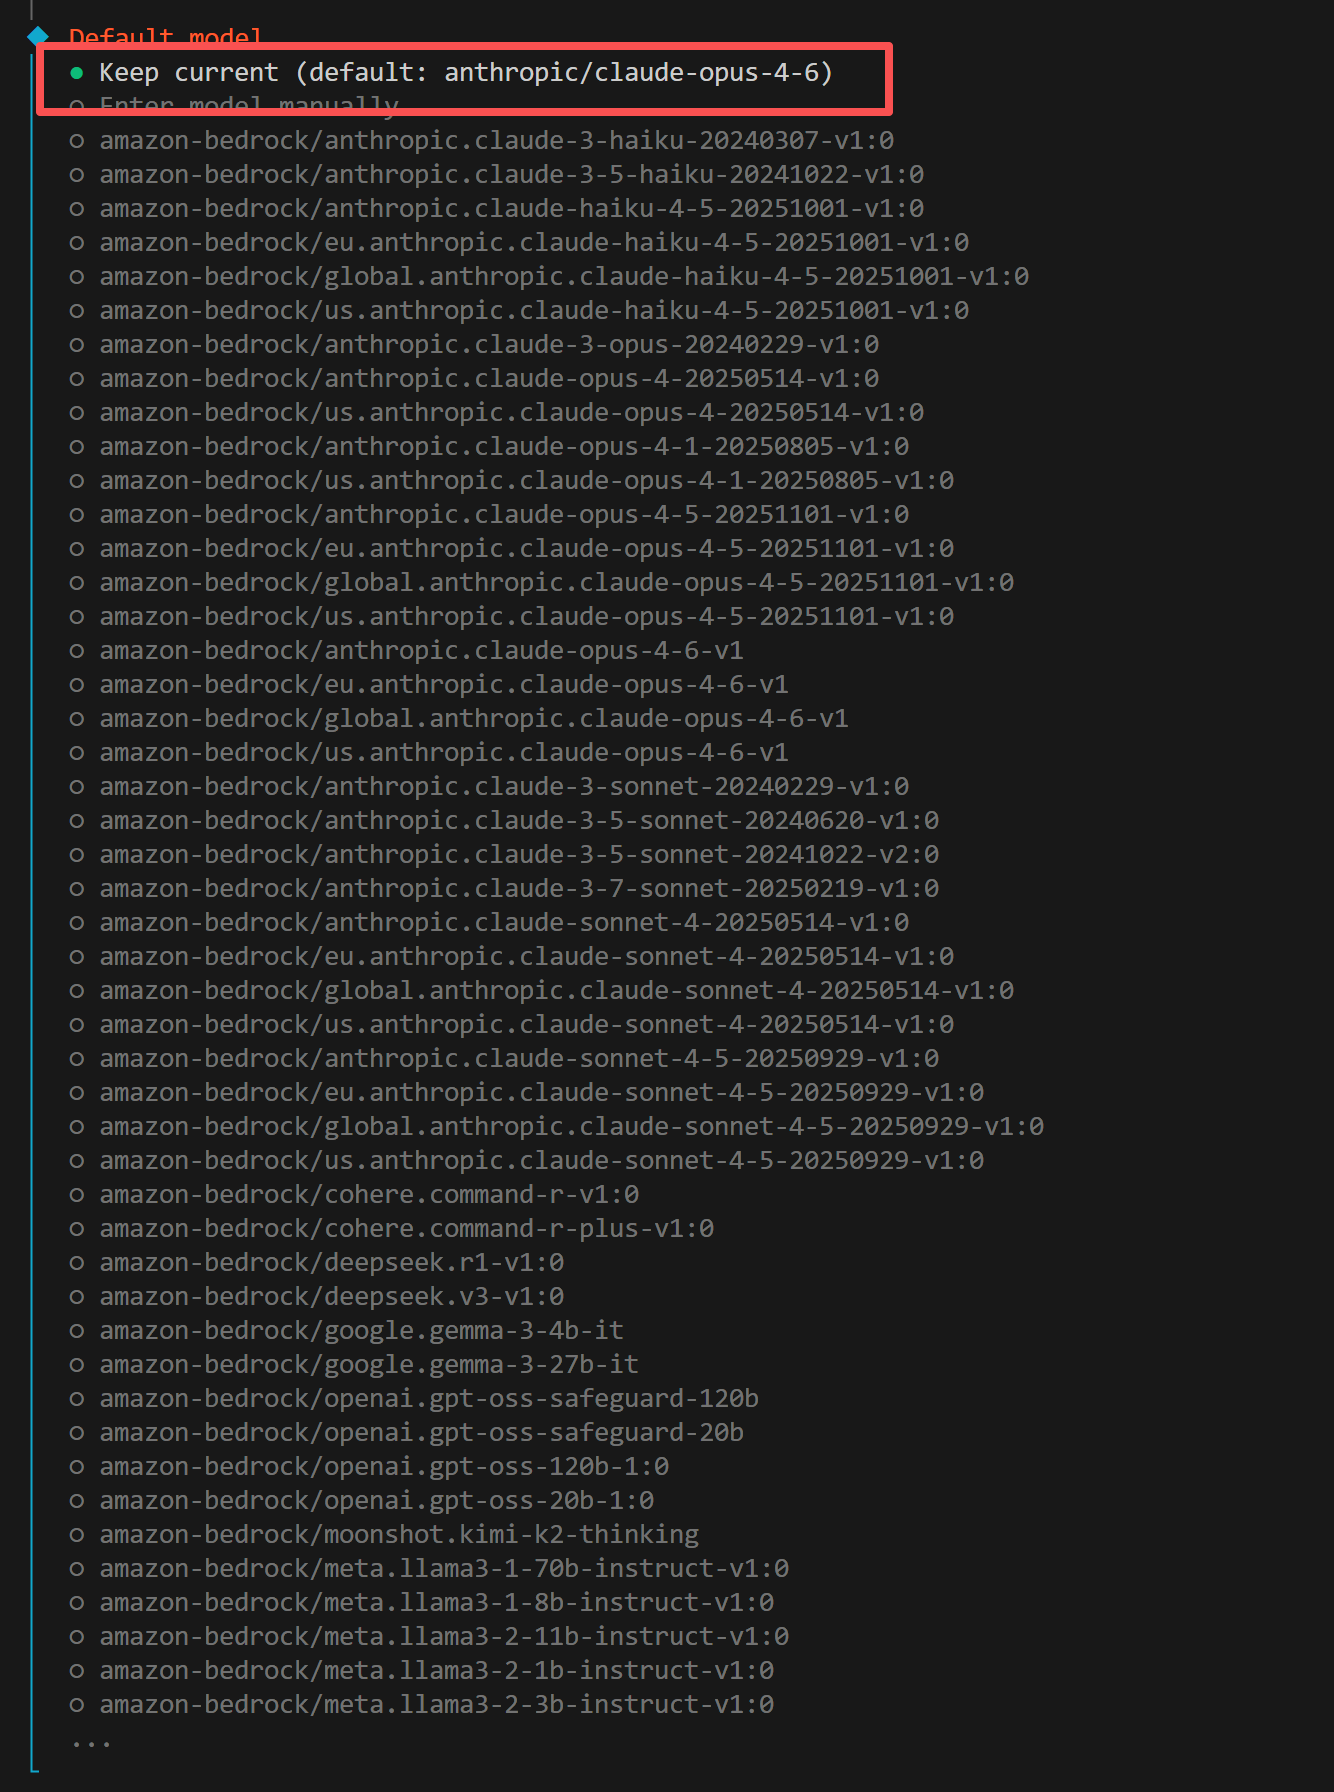
Step 3: Create Feishu Application
1. Log in to Feishu Open Platform
Visit the Feishu Open Platform and log in with your Feishu account.
For Lark (international version), use https://open.larksuite.com/app and set domain: "lark" in the configuration.
2. Create Application
Click Create Enterprise Self-Built Application, fill in the application name and description, and choose an icon. 
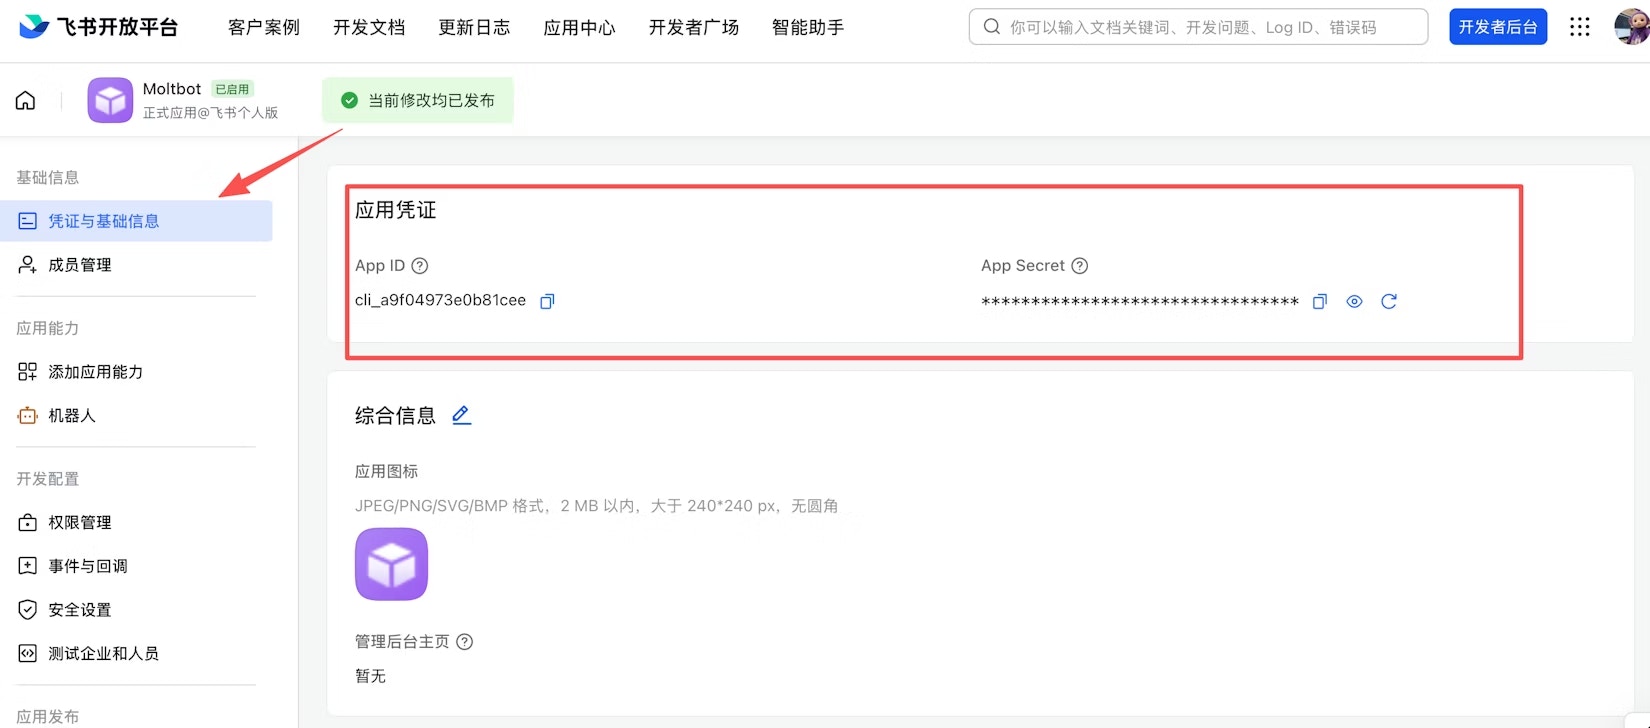
3. Get Credentials
On the Credentials & Basic Info page, copy:
- App ID (format:
cli_xxx) - App Secret
Keep your App Secret safe. Do not share it with others.
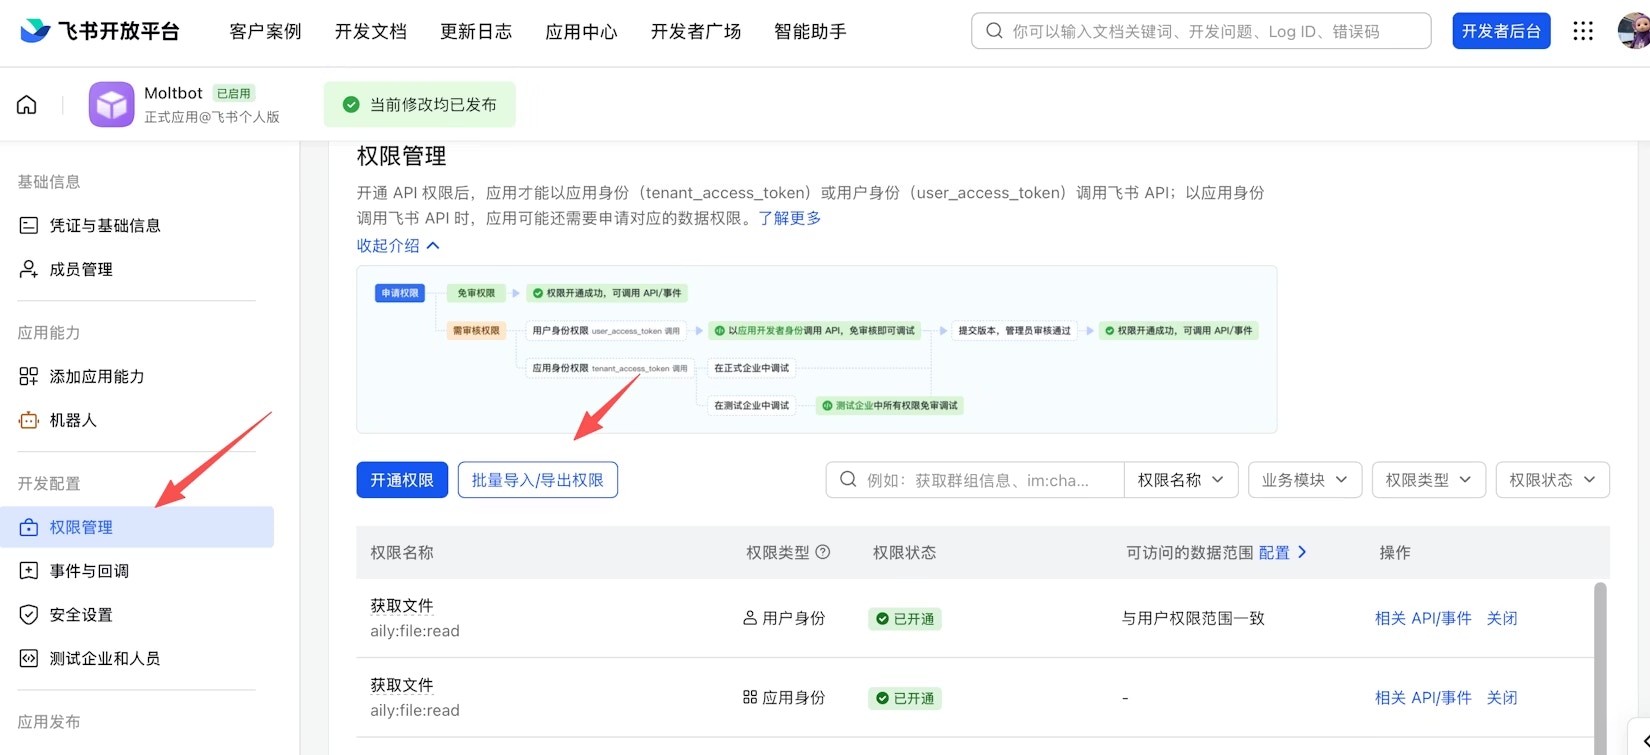
4. Configure Permissions
On the Permission Management page, click Batch Import and paste the following JSON to import all required permissions:
{
  "scopes": {
    "tenant": [
      "aily:file:read",
      "aily:file:write",
      "application:application.app_message_stats.overview:readonly",
      "application:application:self_manage",
      "application:bot.menu:write",
      "cardkit:card:write",
      "contact:contact.base:readonly",
      "contact:user.employee_id:readonly",
      "corehr:file:download",
      "docs:document.content:read",
      "event:ip_list",
      "im:chat",
      "im:chat.access_event.bot_p2p_chat:read",
      "im:chat.members:bot_access",
      "im:message",
      "im:message.group_at_msg:readonly",
      "im:message.group_msg",
      "im:message.p2p_msg:readonly",
      "im:message:readonly",
      "im:message:send_as_bot",
      "im:resource",
      "sheets:spreadsheet",
      "wiki:wiki:readonly"
    ],
    "user": [
      "aily:file:read",
      "aily:file:write",
      "im:chat.access_event.bot_p2p_chat:read"
    ]
  }
}
5. Enable Bot Capability
In the left sidebar, click App Capabilities, find the Bot card, and toggle the menu status to enabled. Once enabled, fill in the bot name and description — users will see these when searching for or chatting with the bot in Feishu. 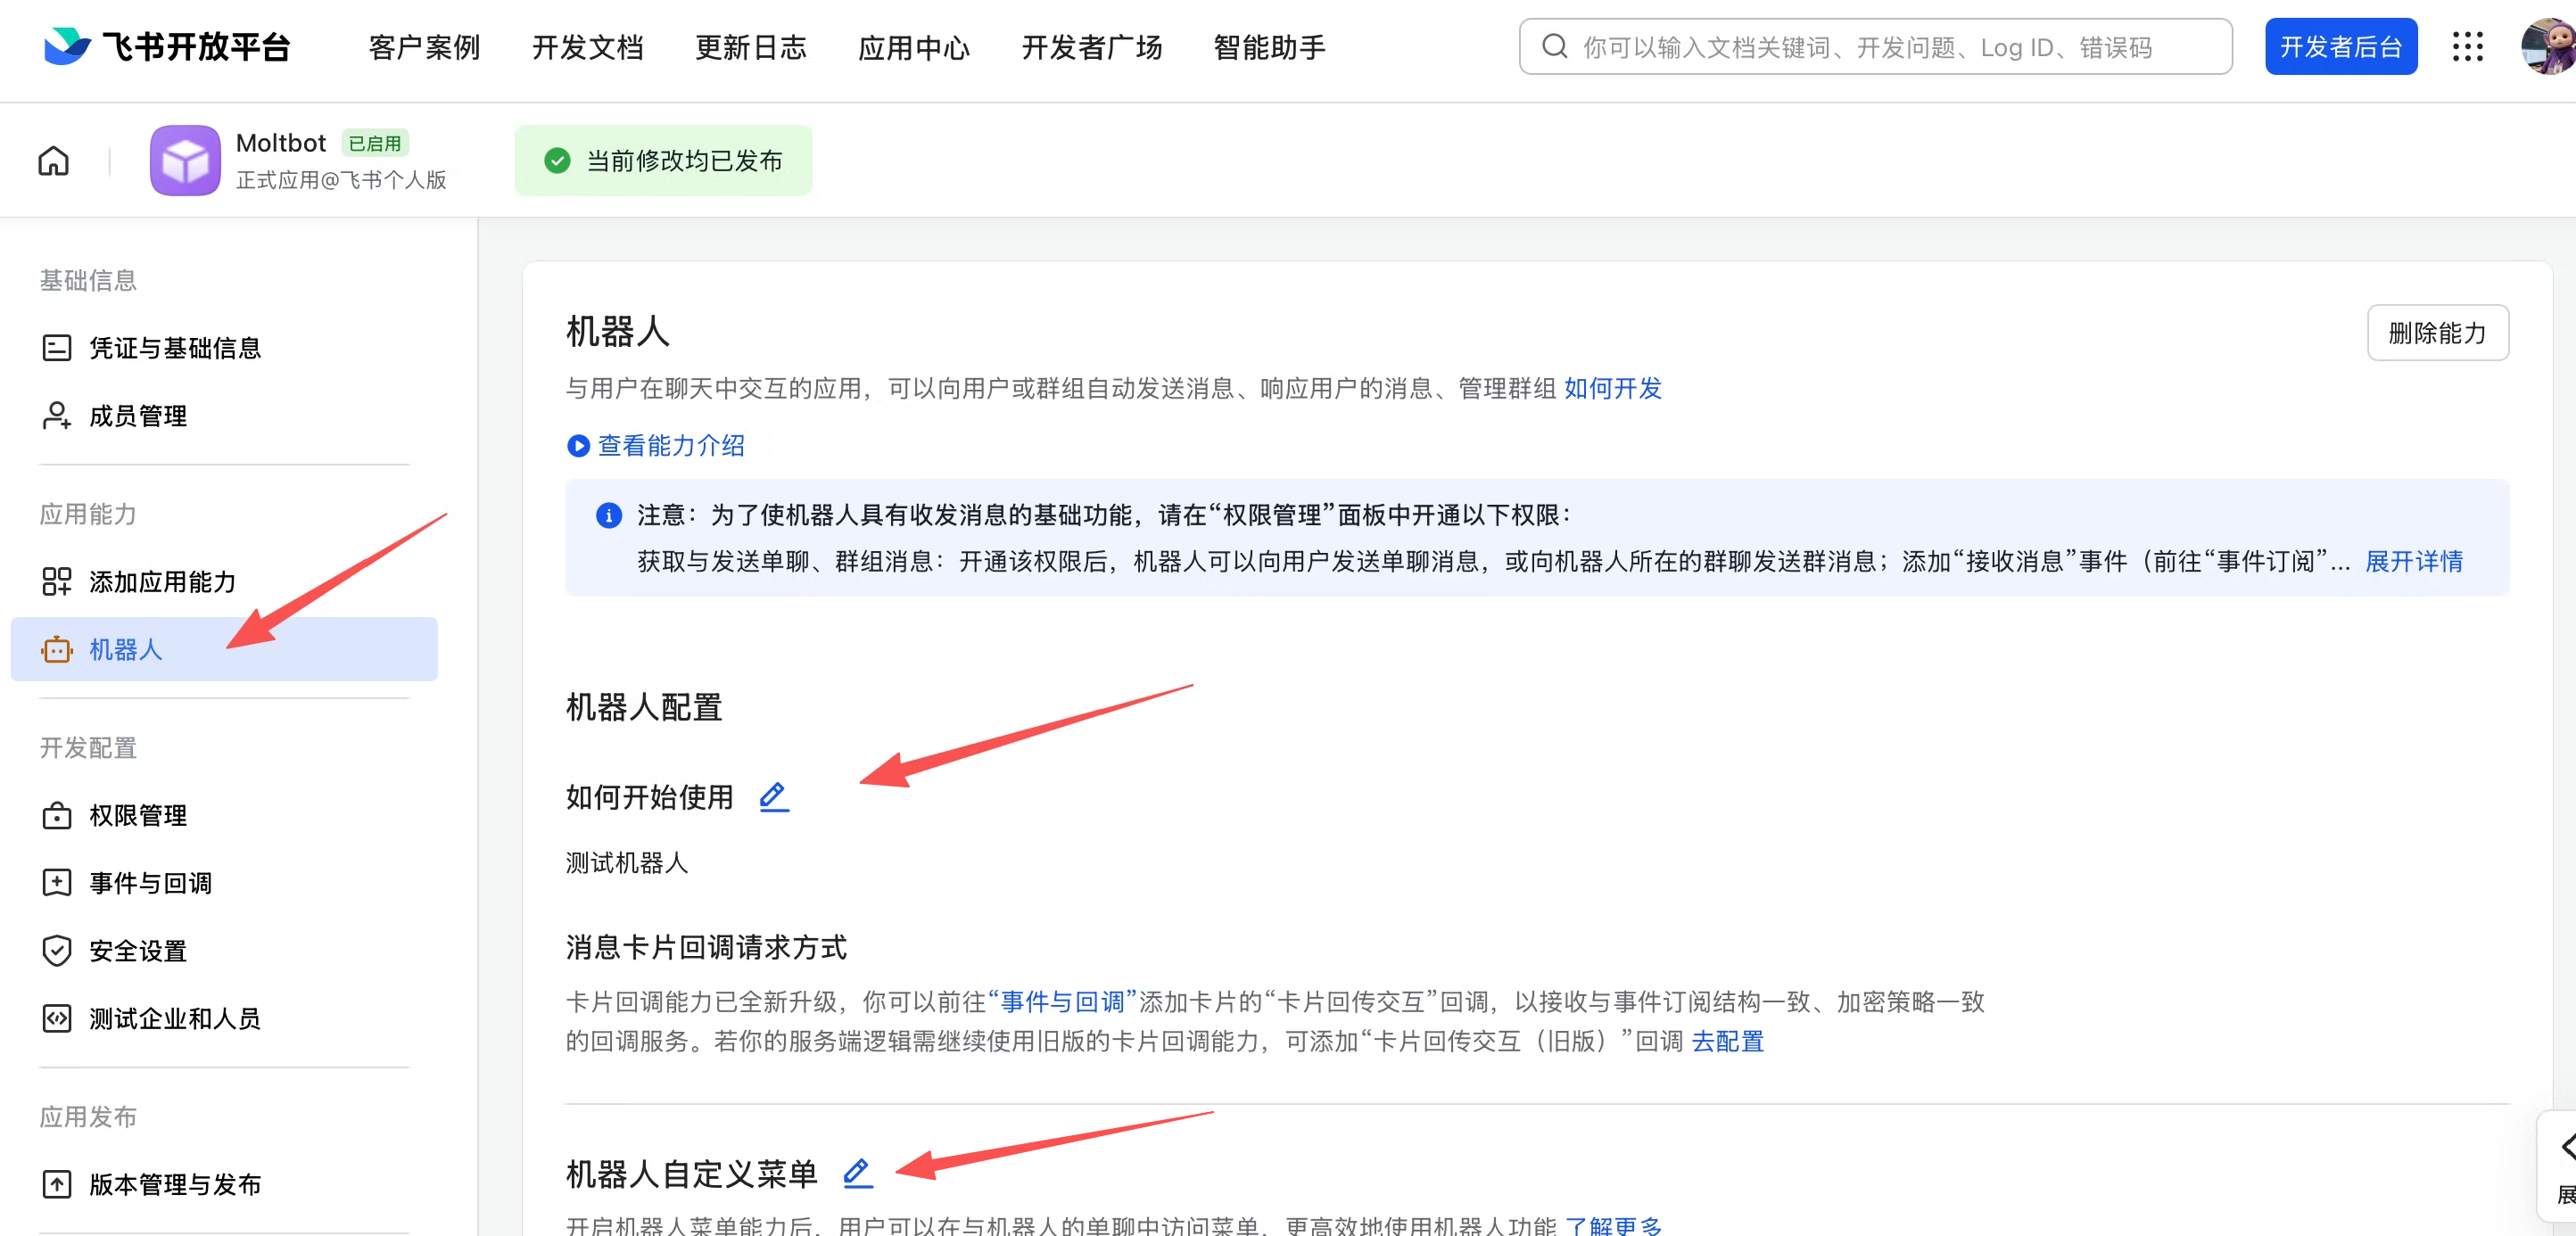
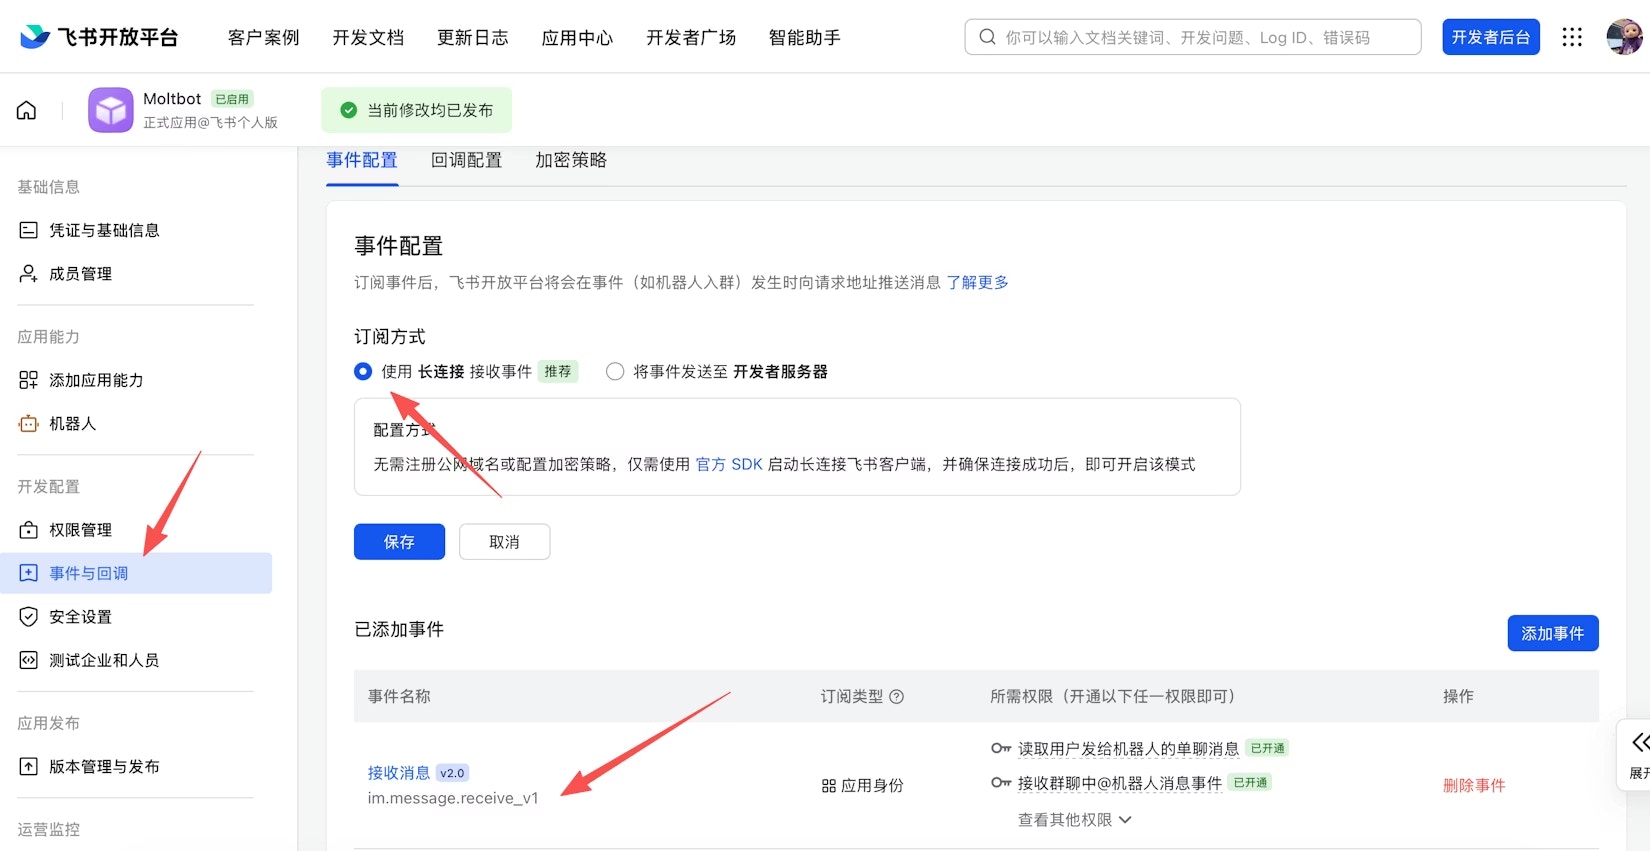
6. Configure Event Subscriptions
Before configuring event subscriptions, make sure you have:
- Completed the Feishu channel configuration (see Step 4)
- The gateway is running (check with
openclaw gateway status)
On the Event Subscriptions page:
- Select Use Long Connection to Receive Events (WebSocket mode)
- Add event:
im.message.receive_v1(Receive Message)
If the gateway is not running or the channel has not been added, the long connection setup will fail to save.
7. Publish Application
Go to Version Management & Release, create a version, submit for review and publish. Enterprise self-built applications are usually approved automatically.
Step 4: Configure OpenClaw
OpenClaw’s configuration is centralized in ~/.openclaw/openclaw.json. There are three key configuration domains:
plugins.entries.*— Controls which plugins to loadchannels.*— Controls channel connections and account credentialsmodels.providers.*— Controls model providers
1. Add Feishu Channel
- Manual Configuration
- CLI Command
Open ~/.openclaw/openclaw.json:Enable the Feishu plugin (plugins.entries):
"plugins": {
  "entries": {
    "feishu": {
      "enabled": true
    }
  }
}
Configure Feishu channel credentials (channels.feishu):
"channels": {
  "feishu": {
    "enabled": true,
    "dmPolicy": "pairing",
    "accounts": {
      "main": {
        "appId": "cli_xxx",
        "appSecret": "your-app-secret",
        "botName": "My AI Assistant"
      }
    }
  }
}
Feishu credentials must be placed under channels.feishu.accounts, NOT under plugins.entries.feishu. Placing them in the wrong location will cause an Unrecognized key error.
You can also configure via environment variables:
export FEISHU_APP_ID="cli_xxx"
export FEISHU_APP_SECRET="xxx"
Run the following command, select Feishu, and enter your App ID and App Secret when prompted:
openclaw channels add
Newer versions of OpenClaw may have configuration conflicts with this command. Manual configuration is recommended.
2. Configure Z-Mint AI API
In the same openclaw.json, find the models field and add Z-Mint AI as a custom model provider:
"models": {
  "providers": {
    "zmint-anthropic": {
      "api": "anthropic-messages",
      "baseUrl": "https://aigc.zhengmi.org",
      "apiKey": "your-zmint-api-key",
      "models": [
        { "id": "claude-opus-4-7", "name": "Claude Opus 4.7" },
        { "id": "claude-opus-4-6", "name": "Claude Opus 4.6" },
        { "id": "claude-sonnet-4-6", "name": "Claude Sonnet 4.6" },
        { "id": "claude-opus-4-5-20251101", "name": "Claude Opus 4.5" },
        { "id": "claude-opus-4-1-20250805", "name": "Claude Opus 4.1" },
        { "id": "claude-sonnet-4-5-20250929", "name": "Claude Sonnet 4.5" },
        { "id": "claude-sonnet-4-20250514", "name": "Claude Sonnet 4" },
        { "id": "claude-haiku-4-5-20251001", "name": "Claude Haiku 4.5" }
      ]
    },
    "zmint-google": {
      "api": "google-generative-ai",
      "baseUrl": "https://aigc.zhengmi.org/v1beta",
      "apiKey": "your-zmint-api-key",
      "models": [
        { "id": "gemini-3.1-flash-lite-preview", "name": "Gemini 3.1 Flash Lite" },
        { "id": "gemini-3.1-pro-preview", "name": "Gemini 3.1 Pro" },
        { "id": "gemini-2.5-pro", "name": "Gemini 2.5 Pro" },
        { "id": "gemini-2.5-flash", "name": "Gemini 2.5 Flash" },
        { "id": "gemini-3-pro-preview", "name": "Gemini 3.0 Pro" },
        { "id": "gemini-3-flash-preview", "name": "Gemini 3.0 Flash" }
      ]
    },
    "zmint-openai": {
      "api": "openai-completions",
      "baseUrl": "https://aigc.zhengmi.org/v1",
      "apiKey": "your-zmint-api-key",
      "models": [
        { "id": "gpt-5.4", "name": "GPT-5.4" },
        { "id": "gpt-5.2", "name": "GPT-5.2" },
        { "id": "gpt-5.1", "name": "GPT-5.1" },
        { "id": "gpt-5.1-chat", "name": "GPT-5.1 Chat" },
        { "id": "gpt-5.1-thinking", "name": "GPT-5.1 Thinking" },
        { "id": "gemini-2.5-pro", "name": "Gemini 2.5 Pro (OpenAI SDK)" },
        { "id": "gemini-2.5-flash", "name": "Gemini 2.5 Flash (OpenAI SDK)" },
        { "id": "gemini-3-pro-preview", "name": "Gemini 3.0 Pro (OpenAI SDK)" },
        { "id": "gemini-3-flash-preview", "name": "Gemini 3.0 Flash (OpenAI SDK)" },
        { "id": "doubao-seed-2.0-pro", "name": "Doubao Seed 2.0 Pro" },
        { "id": "doubao-seed-2.0-lite", "name": "Doubao Seed 2.0 Lite" },
        { "id": "doubao-seed-2.0-mini", "name": "Doubao Seed 2.0 Mini" },
        { "id": "doubao-seed-2.0-code", "name": "Doubao Seed 2.0 Code" },
        { "id": "kimi-k2-thinking", "name": "Kimi K2 Thinking" },
        { "id": "kimi-k2-thinking-turbo", "name": "Kimi K2 Thinking Turbo" }
      ]
    }
  }
}
Replace "your-zmint-api-key" with the actual API Key from your Z-Mint AI Dashboard.
3. Configure Default Model
In the agents field, set the default model:
"model": {
  "primary": "zmint-anthropic/claude-opus-4-6"
}
4. Restart Gateway
Restart the OpenClaw Gateway to apply the configuration:
openclaw gateway restart
Always use openclaw gateway restart instead of manually starting another process, otherwise you will get a port conflict error.
Verify the configuration is loaded correctly:
openclaw gateway status
Step 5: Verify Connection
1. Find the Bot in Feishu
Open Feishu, search for the bot name you created, and start a conversation.
2. Get Pairing Code
Send any message to the bot. It will return a pairing code.
3. Complete Pairing
Open a new terminal window and run:
openclaw pairing approve feishu <pairing-code>
Replace <pairing-code> with the actual code returned by the bot. Make sure to remove the angle brackets <>.
4. Test Connection
After pairing is complete, send a message to the bot in Feishu:
Hello, please introduce yourself
If you receive an AI response, the integration is complete.
Access Control
Direct Message Access
Default dmPolicy: "pairing" — unknown users will receive a pairing code that must be approved by an admin:
openclaw pairing list feishu        # View pending approvals
openclaw pairing approve feishu <CODE>  # Approve
You can also configure an allowlist of user Open IDs via channels.feishu.allowFrom.
Group Access
Group policy is controlled via channels.feishu.groupPolicy:
"open"— Allow all users in the group (default)"allowlist"— Only allow users ingroupAllowFrom"disabled"— Disable group messages
By default, the bot only responds when @mentioned (requireMention: true).
Common Commands
CommandDescriptionopenclaw gateway statusCheck gateway statusopenclaw gateway restartRestart gateway serviceopenclaw logs --followView real-time logsopenclaw pairing list feishuView pending pairing requestsopenclaw plugins listView installed plugins
Troubleshooting
IssueSolutionBot not responding in groupsCheck if you @mentioned the bot; check if groupPolicy is "disabled"Bot not receiving messagesCheck if the app is published and approved; verify event subscription im.message.receive_v1 is configured; confirm WebSocket long connection mode is selectedApp Secret leakedReset App Secret on Feishu Open Platform, update config, restart gatewayFailed to send messagesCheck if im:message:send_as_bot permission is granted; check logs with openclaw logs --follow